Getting Started with Illuminate
Use this guide to familiarize yourself with the application
Home Screen
Examination
Results
Connect
Appointments
How to view messages from patients
1. Navigate to the home screen using the icon in the top right corner of any screen.

2. In the message section, tap on the ‘>’ icon to expand the message section
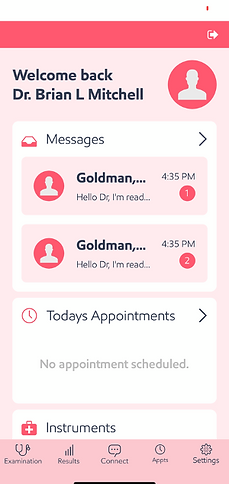
3. Your messages from patients will be listed here in chronological order. Tap on any message to view it.

How to log out of the Illuminate Health App
1. Navigate to the home screen using the icon in the top right corner of any screen.

2. Tap on the icon in the top right corner of the home screen

3. Select 'confirm' to log out of the app

How to conduct a physical exam
1. From any screen, tap on the ‘Examination’ icon at the bottom of the screen.

2. Tap on the start button of the exam you would like to conduct.

3. Follow the on-screen instructions until the exam is complete.
How to view a patient's results and notes from a previous visit
1. From any screen, tap on the ‘Results’ icon at the bottom of the screen.
2. To select the patient’s results you would like view, swipe through the alphabetical list or search for the patient’s name. Tap on the patient’s name.

3. Next, tap on the “View Most Recent Examination” button

4. Notes and results from previous visits will be listed in chronological order.

How to view a patient's medical profile
1. From any screen, tap on the ‘Results’ icon at the bottom of the screen.
2. To select the patient’s results you would like view, swipe through the alphabetical list or search for the patient’s name. Tap on the patient’s name.
3. Next, tap on the “View Patient Profile” button
4. View medical conditions, personal details and contact details by swiping left or right across any part of the screen


How to contact a patient
1. From any screen, tap on the ‘Connect’ icon at the bottom of the screen.
2. To select the patient you would like contact, swipe through the alphabetical list or search for the patient’s name. Tap on the patient’s name and tap either “Call Patient” or “Text Patient”
-
“Call Patient” will initiate a video call to the patient
-
“Text Patient” will initiate text messaging to the patient

How to make a new appointment
1. From any screen, tap on the ‘Appts’ icon at the bottom of the screen.

4. The selected date automatically defaults to the current date. To choose a different date, tap on the date within the calendar on the screen, or toggle through the different months using the ‘<’ and ‘>’ icons on the top left and right of the calendar. The selected date will appear highlighted in a pink circle.

2. Click on the pink ‘+’ icon towards the top right of the screen.

5. Search for the time of the appointment by swiping towards the left or right on the field that lists the available time slots. Time slots that are unavailable or have elapsed will appeared greyed out. Select the time of the appointment by tapping on the time. The selected time will appear highlighted in pink.

3. To select the patient you would like to schedule an appointment for, swipe through the alphabetical list or search for the patient’s name. Tap on the patient’s name.

6. Choose the appointment type by tapping either the ‘Video Call’ or ‘In Person’ button. The selected appointment type will appear highlighted in pink.
7. Tap on the ‘Set Appointment’ button at the bottom of the screen.
8. The app will bring you back to the Appointments Home Screen where you can view the appointment scheduled.

How to cancel scheduled appointments
1. From any screen, tap on the ‘Appts’ icon at the bottom of the screen.
2. Find the appointment you would like to cancel by toggling through the dates on your schedule using the ‘<’ and ‘>’ arrows. The appointments will be listed under the date highlighted in pink.
4. Tap “Cancel Appointment”, then the “Confirm” on the next screen.


3. To cancel the appointment, tap on the icon in the top right corner of the patient’s appointment.
5. Confirmation of the cancel appointment will appear on the next screen. Tap close to return back to the Appointments Home Screen.

